Feeds:
Posts
Comments

I’m currently going through the dreaded emotional rollercoaster
and the physical endurance test of clearing out mom’s house.
It’s a double-edged sword.
I get to at long-last bring my own belongings out of storage to make it feel like home for me, but it also means parting with most of mom’s belongings.
Which often feels like I’m erasing her.
Tears are frequent.

I feel like I should share the path of change, so,
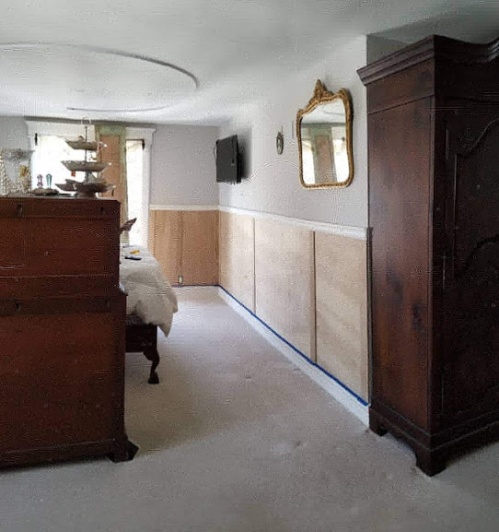
first- mom’s room before & after.
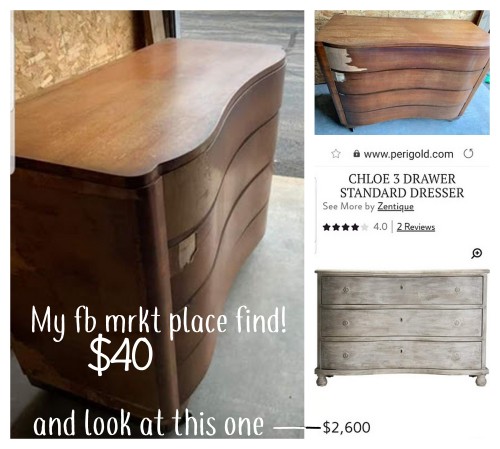
I sold her [inherited] bedroom furniture. . . . . to a nurse.
And that’s probably the only part that she would have liked.
The next morning I had a meltdown~ “WHATdid I do?

These were early pictures of setting it up and styling it for her~
no idea what happened to the pretty finished shots–?
The furniture passed to her from our beloved great auntie who bought it brand new to go in the house she was building in 1910.
Below is the way the room has been REdone.
With MY things, but, in her honor.

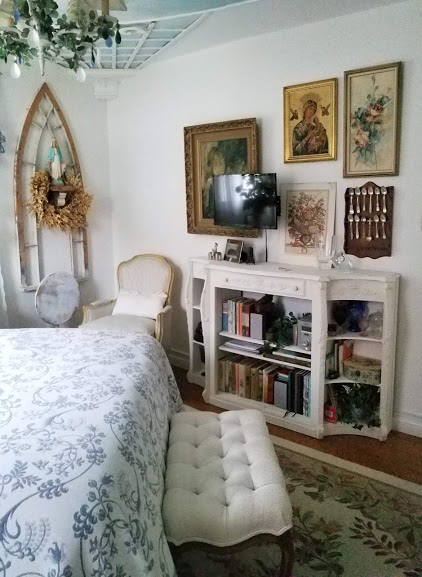
The foundation of the room got a fresh painted job because of all the holes that needed patching. This time the white has a warmer tone. The drapes were already changed to the soft, sheer white with lace, the hand-hooked wool garden rug remained.

The dresser, nightstand, and antique French bergère were pieces already dedicated to “her room” in my former house.

The bed was a long-ago project I posted on. It was an aMAZing mirror that had been broken- I bought the frame to make into a bed!

The looong cabinet was a $13, 5-yrs-ago Craigslist find that finally came out of my stashes, got a good cleaning, some repairs, and fresh paint job!

Many meaningful things have found their place in here–I just couldn’t let all her belongings go. I find myself sitting quietly in her room with regularity, and take comfort in being around her—stuff.

I struggled with letting a LOT of her things go and find I’m letting more of my own things go to strike a balance.

Missing you so much mom—
wish Heaven had visiting hours.

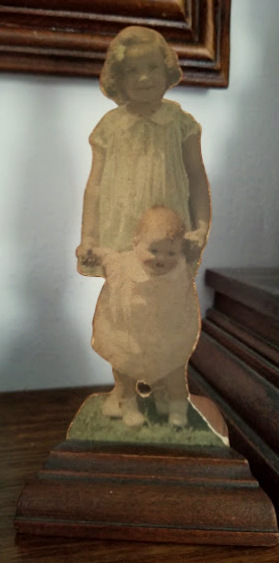
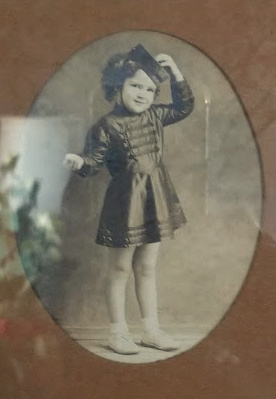
I love this last pre-cancer picture.

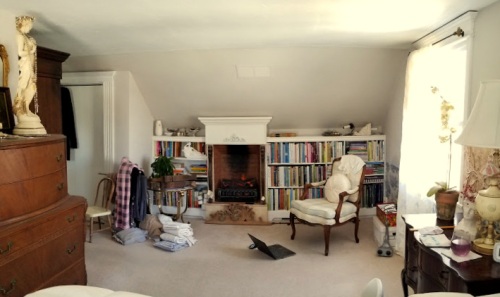
Want to see the “new” Living room?
That’s a big change, come on back

Catherine

So WordPress has seriously changed the whole format for writing a post!

Instead of sharing some of the things I’ve been working on, I guess my NEW project is figuring it all out just so I can share some finished projects!

Sigh. NOT what I need about now.

Until I can figure out how to do anything– please follow me on instagram to see what I’ve been doing!

https://www.instagram.com/freddyandpetunia/

Catherine

a “new” life

Life.  A very tough two years of taking care of my mother in cancer.
But her fight is over now—she passed 19 days ago.
A revelation I’m still coming to terms with, since t
he pain feels like yesterday.

We, optimistically, created this banner for a private page that kept family & friends up to date on her fight.  And now, broken heartedly, I’ve changed it . . . .

Cancer Sucks!

Cancer Sucks!

After 2 years of her all-consuming care, how do you just stop cold-turkey?
I find myself completely lost, trying to readjust to not being “needed.”
Someone inserted a poem in their condolence card-

When Tomorrow Starts Without Me

-it sent me into a blubbering cry all over again.  But it also helped me hear some of her last words again, telling me how much she loved me, & was so proud of me.  I would gladly sacrifice another 2 years to still have her here.
Someone also told me a daughter’s loss of her mother
is like no other loss you can ever know.  I feel it.


She left me her house, wanting me to find a way to make it my own.
So I am still connected to her in that –ever so gratefully
I hope I feel her around me always.
She knew I would find joy again through re-creation.
So I guess I will have projects to share—as I find my way forward once again.
But give me time-

Catherine

when tomorrow starts without herwhen tomorrow starts without her

Cutting to the chase
I’m currently working on a custom bookcase.

My main project is taking care of mom,
but I squeeze in anything else I’m able.
And right now that is a custom bookcase for mom’s bedroom so she can have
the things around her that make her happy & bring her joy.


While I complete this project, but before I share with you–
I just wanted to share a few of those special things that will go on the shelves!

pictures of my grand parents

my grandpa's baby shoes!

Above are pics of my grand parents in their youth-
my grandfather in his WWI uniform.
And those little leather shoes were my grandfather’s, 1890-something!

my mom with her favorite dolly! my mom in her dance costume!

The other two pictures are of
my mother as a little girl.

One in a dance costume, and the other with her favorite doll!  It was applied to wood and cut out—back in. . .1936?
Aren’t they so sweet?

♥♥♥
Bookshelf project next!

Finished, paint drying, about to get loaded up!

Catherine

mom-♠ The end of summer 2018.
Cancer entered our lives.
It took over -in fact.
Mom won that fight but recovery is another battle.
The cancer was sneaky -it spread -and she has to summon the strength from SOMEWHERE to fight some more.  And my job as caregiver goes on.
I WILL see her through.
I told her I’m not finished with her, and not fighting alone here, so she has no choice.  “..got that Missy?”
Please, pray for her. ♠


So I’ve already told you how
mom & I flipped bedrooms.

For me -a pseudo apartment!  I last showed you the beginning transformations of the Library to a Boutique-styled dressing room!  I’ve found small amounts of time each day to do a little bit more, and this is where things stand.  Even at this point it’s a LOT of fun!  But admittedly-

a big indulgence!

I’ll just leave you with pictures!
Overlook the “still there” chaos, please.

Catherine

standing against the book shelves-

Standing against the book shelves to show you the clothing part of the room!

Then- standing in front of the flr-ceiling windows for the Shoes-Purses side!

the Shoes & Purses side of the room!

You can see how the room connects to the hall & bathroom from this perspective- and the 2nd bathroom door that’s open to the bedroom.

dressing room- dressing room-dressing room-
dressing room-

I’ve still got to switch out some furniture—a long-ago bench project will finally get put into play!  And a mannequin will show off a couture dress!


The final shelf and closed door storage are up for debate.  I have a few things on my wish list so –we’ll see!


Since it’s all so
over-the-top anyway–
maybe a wine bar?


It may start taking longer
to get dressed!

* Uh-huh, yeah~  I’m bouncing from project to project, which means nothing is getting –finished.  I just don’t want to keep getting paint out, then clean up-put away, then get it back out, then clean up……..  You get it.  So until I finish everything marked for Cornforth White–the job bounces.

Below you can see how I got a little over anxious to see how the new color would affect the built-ins, and used some of the wall paint to see!

turning the Library into a Fancy Dressing Room!

I did get some eggshell Cornforth White mixed to paint properly!
The interior of the bookcases will be a soft white.
* I can report- the Cornforth White wall paint is now cleaned up/put away!
** I dread moving all those books!  TG it’s just into the hall!

room for clothing display-

My initial plan was to hang decoratively framed slat board
—about 2ft high × 56″ wide—
high on the wall adjacent to the closet for flexible hanging of clothes & hats.
I was fully ready to order metal hangers- (×4) 5 hook waterfall hangers $1.95 each & (×20) hat holders w/foam pads $2.50 each, for a total of $57.80.
I figured I earned this treat.  And then they informed me the shipping would come in at $59.  Uh–  NO.

dept store hangers!

So I will BUILD what I need.
1st- I decided to now add a long buffet mirror high on the wall-
then layer in my own hanging system.
I ripped wood to create a “shelf” to fit under the mirror.  Simple pieces, run through the router table with a ½” round-over bit for softer edges.
2nd- I ripped 3  2½”×14½” strips to “mimic” the one cascading hanger I happened to have—which became my guide.
3rd- 
I pinned all 3 arms together.  All cuts are made at once AND uniform.  The Dept Store hanger I had hung on a 10° angle, so I cut the ends of mine to match on the chop saw.  I tipped the table saw blade to 10° to make the slits that will catch the hangers.  I spaced my slits at 1½” apart for 10 slits.
4th- I separated the arms and ran those through the router too. 

making my hanging arms-my hanging system-  

I screwed the arms into the shelf from the back side with 3″ & 2″ screws for the most stability against the weight of the hanging clothes.
I took the whole assemblage outside for a primer coat.
Finally- I screwed the shelf to the wall finding 3 studs to make sure
nothing is falling down!

I had to test things out right away!

(Mom still had a few clothes needing to get moved downstairs.)

I’ll leave the mirror in its dark stain, but paint the rest to blend into the walls.
Then I’ll load everything up!

I’ll tell you about the hats soon~

Catherine

No—wire—hangers!  ; D

my hanging system-

My preference is to focus on
one project at a time-

GET IT DONE!
And then there’s
REALITY.

Working on this  –2nd floorMy New Spaces–  project has literally become a “work on ANYthing you can- as you can- when you can” project.

Like-  my computer has wAy too many tabs open!


Super frustrating, but things ARE actually progressing.  Paint has been constantly at the ready–a tray full of Farrow & Ball’s Cornforth White, standard roller, weenie roller, sash brush–kept in a giant ziplock bag, out of any sunlight or heat source.  I’ll clean up and put away when I’m –finally- finished with everything in the main body color.

I over estimated how much paint the main project needed, so having extra let me REpaint the Library too!  Which brings me to another exciting project—that room will be transformed into a boutique-styled dressing room for MOI !!!

a LIBRARY no more- a LIBRARY no more- becoming a DRESSING RM

becoming a DRESSING RMThe built-in bookcases will become display for my high heels & purses, the closet will become open clothing display, the neighboring wall will add extra display with dept store cascading hangers, AND some hat hangers too!
My old Walk-in-closet?  Fah’get about it!
Talk about a dreamy room!

The secretary in the corner (just lost its legs getting moved upstairs) will get a paint-job and become a dedicated spot for jewelry-making!

I started painting the built-ins with the wall paint, thinking to just clear coat them afterwards, but decided to go get a qt of eggshell mixed up to paint them properly.
The Oz books will move to hall bookshelves.

Furniture is coming out of storage to make all the finishing touches!  I’m so excited!

Catherine

becoming a DRESSING RM

Here’s a quick & crude layout of the 2nd floor—roughly 800sq ft!

2nd flr layout

We got home from the hospital just before noon Friday
when it dawned on me

we have NOTHing until Monday morn.

Whaaa ???

I’m ALL over this!

I got mom settled in- some lunch, the tv remote, the fireplace going
(comfort & warmth) and jumped in the car to GO GET SUPPLIES!!!

—1st a trip to Lowe’s for a 2nd bucket of Venetian Plaster to start some wall corrections—a very maddening story.
—Then Home Depot to check in on my air compressor repair—an even MORE maddening story.  AND I had them rip some of the prettiest flooring under-layment boards for me on their panel saw- boy do I want one of those!

* This is a SHOE-STRING PROJECT/BUDGET.  And I’m cheap.
Menard’s had the best price on the desired boards, but won’t rip them down for me to get in the car.
Lowe’s and H.D. had matching prices, but H.D. had the most amazing looking boards!  Actually- too pretty to paint- but I did anyway!  They ripped the 4×8 sheets to 38½” (which I could get in the car) and I only had to cut my lengths for the runs and around windows.  HUGE help on a solo job.

Here’s the next part of the project— I need to deal with the wallpaper.
Stripping is going to be a lot of work.  The wall is flat-finished underneath and textured above so I’d have to deal with THAT before moving forward.
Just covering over it is going to be WAY faster and easier!

hanging my "Board & Batten"hanging my "Board & Batten"

I chose under-layment for the cheap price tag AND its ¼” thickness.  It will keep my cover-up job to the most minimal profile.  Basically- just texture.

I REhung the original chair rail, ripped and added the battens, sanded & caulked, and got busy painting.
The bed wall.
ALL on Friday.
My muscles needed a LONG, hot shower.

This is what I woke to Saturday morning.

hanging my "Board & Batten"

Saturday morning- after another loooong hot shower just to get my aching muscles moving, I got busy moving furniture and started the other side of the room.

* This work required a constant repetition of up & down from the floor,
up & down the stairs,
in & out to the garage workshop of saws,
back inside the house.
Who knows how many trips.  But my muscles were barking!
And did I lose even 1 pound?   NO.

hanging my "Board & Batten" hanging my "Board & Batten" hanging my "Board & Batten"

13½ total  grueling  hours.

But at long last– no more blues & blue toille wallpaper.  A cleaner, simplified palette for me!  And no more moving-men disks parked under furniture!

I’m working on a ceiling treatment, as you can partly see.  Have many details to work out, and CAN’T WAIT to pull artwork and prized furniture from the storage unit!

THEN I’ll really have an awesome reveal to share!

Catherine

The room is getting finished! The room is getting finished! The room is getting finished! The room is getting finished!

Tough, busy week–
and I still managed to steal time
for a little of this&that!
I got things  D O N E!


This was my view this morning!
It’s a-MAZ-ing to have a FULL-fledged bathroom again!

a FULL-fledged bathroom!

It was such a full week, and I truly had to steal time where I could find it
to work on ANYthing.  I don’t do chaos very well—and everywhere I look is

chaotic!

Mainly, I plugged away on the dresser that would become the new bathroom vanity.  I found it last summer on fb marketplace for a flip project- but then it sat.  I was SO lucky that it was still waiting AND the PERFECT SIZE for this bathroom!

my AWEsome fb mrkt place find!

I only just recently saw the Perigold dresser,
but I knew my find was CooL from the very start!

The bathroom space could only take up to 48″ — the dresser was 48″ !!!
I really wanted a higher vanity — the dresser was 35″ high !!!
I even had some bun feet in my stashes to make some aesthetic changes!
* I still am debating hardware or leaving the clean front. . . hmmmm.

Anyway– I removed the dresser’s backing to get to the drawer construction so I could make way for the sink & plumbing.  I cleaned the interior carcass, made a few repairs, removed the frozen in place, inappropriate wheels, hustled the VERY HEAVY piece in the house, up the stairs, and set in place for a test fit.
Looking FAB!

getting the dresser ready for a sink & plumbing

getting the dresser ready for a sink & plumbing

I worried at 22″ deep it would be too much for the small bathroom footprint- but it worked!  Finding a smaller sink was a struggle- but Lowe’s came through!  And to stay in my shoe-string budget, I reused the pretty, former bathroom faucet.

With the dresser flipped upside down, I removed the combo apron-foot bottom & prepped it for bun feet.  I took the bun feet & now detached top to the strippers for an assist—they stripped the top & I used their band saw to cut the feet down.
In the right place-right time, I only paid $20 for 8 of these!
The new vanity height is now 36″tall.

I bought 8 of these for $20 many years ago!

I wish mine were a little smaller & more like the inspiration’s
but- “use what you’ve got” is what fits this budget.

the inspiration-

The top was walnut veneer, in good shape, so I left it natural and gave it 4 layers of clear-coat.  I tried the sink in 2 positions- on the left & in the center.  I even put my stuff on the counter for a mock up to see what worked best!  Then I cut the hole, set the sink, and waited for Gary to hook me up!

I was able to keep the WHOLE 4th drawer, but lost more than half the top drawer.  Once he connected the plumbing, I was surprised to discover I could keep most of the 2nd & 3rd drawers!  I’ve got a LOT of storage—wOw!

♠ Cutting drawers down is a true workout.
I’ll have to break that down one of these times.
Yowza!

My new vanity and sink!

The last thing I did before quitting last night was to sand & paint the drawer fronts.  Today I’ll finish them off and  LOAD THOSE DRAWERS!

Some CHAOS is coming to an end!

I’m still thinking about that hardware-

Catherine

In as much as I’m trying to work on/clean up my new spaces, well,
mom’s care comes first.
And it’s been a tough week.
With setbacks.
But-


—The Bathroom project—

The kindly backyard neighbor-Handyman came to help me with key areas of change.  Some things I just don’t DIY—way too much room for catastrophe!

The bathroom setup worked well for mom—but not me.  AND, unfortunately,
I discovered several problems needing attention-repair-replacement.
Great excuse for change though–right?

(A wall cabinet was removed on the upper left side the day before.)

"mom's" bathroom

One change made me sad—I really liked the neutral, faux brick, textured flr tiles.  But they were looong passed good condition, and she was covering a lot of it with a decorative rug to get by.  I’d have dealt with it sooner had I realized.

Two flooring options stood out in selection.  One was “safe,” the other super fUn!  Leaning heavy on “fUn” presented two obvious downsides.  A really busy pattern opposing the diagonal Travertine shower tile—and a slick finish for a wet room.  But it’s SO pretty.  Like the popular painted concrete tiles!

“Safe” it is.  And it has a slip-resistant texture.

A practice fitting (of both tile selections) on the Vertical, Horizontal, Diagonal, and Herringbone showed the Horizontal to be best suited with ALL the elements.
The handyman-neighbor removed the toilet, I removed the old vanity, did big cleaning & prep work, and GOT BUSY!
AND- Gary put the toilet back in place by nightfall!  YaY!

the flooring- the flooring-

Actually, I need to back up here and add that BEFORE I laid the floor, I troweled on Venetian plaster in the toilet corner.  THAT is a project better done without many obstacles!

Then the bathroom project went —INTO THE HOLDING PEN—for much of 5 weeks.  That’s a story.  The bigger story however, is how I had to adapt to washing my hands in the shower.  And YES– water splashed everywhere!

To not lose time, I bounced back to the bedroom.  I painted the ceiling a soft white, and the upper walls Cornforth White (Farrow & Ball).  It’s a lot like a griege, and incredibly soft and neutral.
I pried off the chair rail and was going to start stripping off the toile wallpaper on the lower walls, but realized I had another problem to solve.

The upper walls were skim-coated during all the renovations years ago—but the lower walls were already covered in wallpaper.  Stripping the wallpaper would reveal two different wall textures!

So I’m going to cover the lower with $13- 4×8 sheets of plywood under-layment, add vertical strips to give it a Board & Batten look, and add back the original chair rail to finish it off.  At ¼” thickness (×2 at the battens) it will be very low profile—just “TEXTURAL” & ALSO painted in the Cornforth White.

Now THAT’s how to strip wallpaper!  ; D

starting to paint the bedroom- starting to paint the bedroom-

Although the project is moving at a  –S N A I L’ S pace– it IS moving along.

And I’m so excited to say that the bathroom sink is getting installed and reconnected –this weekend!

Hallelujah!

Catherine