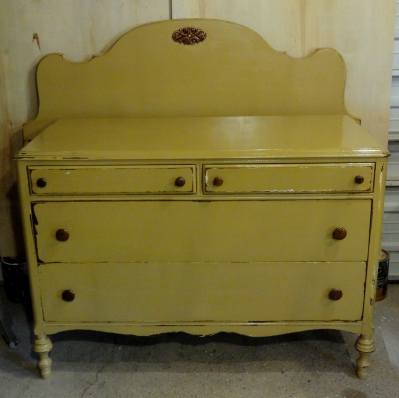
I stumbled onto this “pretty” dresser for cheap,
then took a much needed, relaxing drive to a very small, out-of-the-way town to go get it!
An awesome drive with some aMAZing old homes along the way—I’d love to make the drive again just to take lots of photos!
Anyway- I bought the dresser. Sure, I knew it had some obvious issues, but nothing I couldn’t handle, and the owners rapidly loaded it up for me. When I was home and off-loading it I finally started to see other problems.
Oh boy.
The biggest problem-
a completely broken,
poorly “repaired,”
(& totally concealed) front left leg. And remember the front is a big curve!
 Okay- this is not so much a problem for MY skills as much as, with mom’s full-time cancer care—I just don’t have much time for this. I just wanted a FUN-EASY project to work on when I can find bits of time.
So -g r e a t- let the fUn begin.
I started with all the veneer problems, and then pondered on that broken leg. At first I was hoping to clean out the terrible “repair” job and fill it with bondo. It never set up with enough stability, and I’d NEVER put my name on that kind of work, so after a LOT of wasted time & materials- I ended up cutting away all the damage and just REbuilding it.
*Sorry- no pics to share. But- I used scrap wood I keep on hand, figured the angles of the straight side to the curved front, glued & nailed in place, let it fully set up—then fine-tuned/shaped with coarse sandpaper in a belt sander. Now it is S O L I D.
I also stripped the top and discovered issues hidden under the SUPER DARK over stain job someone gave it at some point. Looks like it was overly sanded in a few areas, but it REstained nicely and looks beautiful now!

I waxed the top instead of clear coating it—I just think it brings out the richness in the wood more and is softer to the touch! But that’s just my preference!
OH! And I heat-set the wax before the final buffing. The wax becomes a harder, more long-lasting, durable finish.
 Next- I taped off and covered and protected the top, then painted the body with a spongy weenie-roller—about 7 very thin coats. Left side, right side, front, left side, right side, front, left side, right side………
Each thin coat dries so quickly and all those thin roller-coats finish more like a sprayed piece.
*Hint- I don’t have a sprayer.
Once completely painted–it had several days to set up before I could come back to it. Actually, it was probably a week later (hospital schedules and all). I had planned a decoupaged face and the time-lag gave me lots of time to plan the finished look. AND figure out some other more appropriate hardware.
 I was looking through ig and this caught my eye—it reminded me of a poster in my stashes! That’s how my plan came to be. . . with a few adjustments.
I measured off, taped my poster to the dresser face, then used a sharp Exacto to cut each drawer section free. I was careful to save each face-frame part since I still wasn’t sure if I’d use it or not (I did in the end). A pencil gave quick registration marks for placement to keep everything aligned.
Working from the top down, I pulled each drawer(s) out as I worked on it. It let me double-check the alignment because 1) paper stretches when it’s wet, and 2) I was already messing with each section by my personal method of “distressing!”
–
–
Yes! I wad it up
into an abusive ball.
Yes, it gets torn some!
It’s all part of that
“aging” process!
Then I smooth it out gently by hand, apply a really good wallpaper paste and REapply to the drawer face.
I prefer to smooth it out and position it with my hands at first, THEN use a flex-plastic scraper to gently smooth it out, pushing out the excess paste, and finally, wipe it down with a damp rag making sure the edges are well affixed.
Here’s my poster (from Hobby Lobby).


Working on the last drawer-


And then I decided it really did need the slight face frame cross sections after all.
You can also see I added my selection of vintage hardware right away!
SO much better!
*I filled former hardware holes and REdrilled before painting. I poked through the paper with an awl to reveal the new hardware placement.

Now you can see how the poster was NOT large enough to cover the face,
but I had a plan! I taped it out to expand the size with a “frame.”
But that wasn’t all.
I used a liquid gold leafing pen to freehand outline the very outer frame edge.
Irregular on the inside edge–crisp on the outside edge.
I just like that subtle contradiction!

I guess I forgot to tell you how I lightly sanded all the wallpapered edges, huh?
In hindsight, I wish I had widened the “frame’s” sides. Oh, well. . . .

This project was completed in drips & drabs of time.
I bought it May 18th and finally finished it on the 29th.
I loaded it in the car right away and it went to the antique mall the next day where I spent hours REsetting my space to accommodate it! WoW- my space had become a neglected disaster area! And guess what?
It sold right away!
Awesome!
But my space is a disaster once again for the new void.
So I found another dresser to work on. Stay tuned.
Catherine
Not an antique-
not even vintage-
just O L D.
But pretty now!


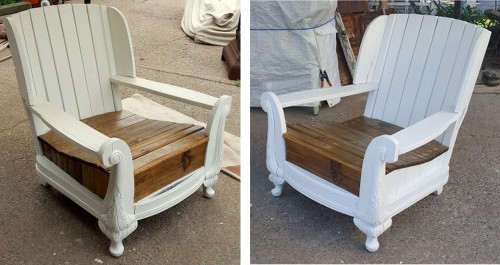
-my next dresser-

Read Full Post »


 The built-in bookcases will become display for my high heels & purses, the closet will become open clothing display, the neighboring wall will add extra display with dept store cascading hangers, AND some hat hangers too!