Feeds:
Posts
Comments

Archive for the ‘chairs’ Category

a vintage folding table…just a few more of the broken items “gifted” me.

I LVE this table!

I especially love uncovering some of the mechanics & methods that were used–wAy back in the day!

The system they used to lock in the legs is actually pretty ingenious, don’t you think?                                        Although, it is a little bit wobbly, I’ll bet if the long locking-slat was WIDER it would remedy that issue!
In this instance, even though I could make things sturdier- I wanted to leave it “original.”

a vintage folding table

The table was fully stripped to clean it up–the original finish was NOT cool!
It took a LOT of sanding to further clean up, and then just a clear stain mixed w/a very small amount of tint to REstain the TOP to BOTTOM.
Ugh…yeah…not good enough.  It definitely needed some color.
I finished the top with 3 layers of paste wax for a silky finish.

the old school desk chair

I moved on to the really old school desk chair.  THAT only needed a good sanding, the leftover tinted stain from the table, and I sealed it with a clear coat.
I accidentally got some stain on the (kind of) rusty pedestal—interestingly, it made it look better.  So I hit it all and wiped it down!

The pedestal is “adjustable,” but I left it where it was.  I toyed with raising it the whole way for cleanup, but let’s face it- I went for lazy.
Even without being bolted to the floor, it’s surprisingly stable!


Here it is with the table!

the vintage folding table & the antq school chair!

And now
what to do with that old broken kitchen chair?

Apparently, I’ve forgotten all about Before Pics anymore!

the old, UGLY, kitchen chairIt looks like an ugly 70’s or 80’s era oak kitchen chair.  With a missing- broken off back.  Which is actually a bit of an improvement.  A bit, okay?

I gave it a light sanding for a “tooth” and then painted it a blue’ish green I really luv!  I padded and upholstered with one of my big brother’s old, W O R N-O U T quilts.

It’s surprisingly a pretty comfortable seat-

and could be kinda’ cute in a bathroom!

Catherine

*THIS was a really tough post to write.  I knocked over a glass of cranberry juice -which, just like a Bull’s eye- aimed perfectly for my keyboard!  Arrrrrgh!  Now ENTER doesn’t work.  Just try using your computer without ENTER~impossible!

Read Full Post »

Sure- I do love to REcreate and REinvent some crazy stuff, but,
seriously, it’s come to this?

“I have this broken rocker and thought of you.
I just know you can do something with it!”

the broken rocker~Um. . . thanks. . . ?


Rocker treads eat up space
-that I don’t have so much of-
so I hung it from the rafters in front of my wall of paints thinking it would be out of the way until I figure out what to do with it.

Honestly- I was thinking to just part it out into other projects, but, I don’t know yet.

I hit my head on that dang thing more than once.  One time, SO hard I saw stars.  And had a headache for a day.


When I get mom and all her things settled each day, I’ve been -trying- to give myself time in my studio, where so many projects await my attention.  OMGosh, it’s just nice to be IN my studio.  And even with my loooong absence–I’ve had enough of that rocker.

Do I take it apart, or to another level?  Hmmmm. . .

Have you ever seen a rocker for 2?  A rocker and a half?  A chaise-rocker?
What if I deconstruct part of it & just REmake it into something… W I D E R?

a new life for a broken rocker a new life for a broken rocker


¹  The LEFT side was the broken and missing parts side, so I removed that side’s legs & rocker tread and made the numerous repairs.  I gave the re-glued and clamped parts 24 hrs to fully set up.

²  I used heavy card-stock paper to make a template of the right side seat contours.  I ripped some leftover 2×6 lumber for the width & thickness to create an extended seat.

³  I flipped & copied that contour to the new left side, cut it out with a jigsaw, sanded, created pocket screw joinery for some areas, and pre-drilled for 3″ screws at other joints.  I also had to REshape how the 2 fronts join together. 

a new life for a broken rocker

a new life for a broken rocker

diagram of a chair

Above you can also see I REdrilled with a 1″ mortising bit to REfit the legs and rocker tread.  What you can’t see in these pics is that I also pre-drilled for large dowels to join the legs together for stability—
aka STRETCHERS.

Until I was able to go buy the appropriate size dowel, I just moved on to prepping and painting.

a new life is coming together for this rocker!

I added extra supports for the seat (& the new padding).

extra supports for the seat

I heavily padded, then upholstered the seat.

I was actually a little disappointed.  I only wanted to have an upholstered seat TOP, maintaining all the wood edges and frame.  But when I had to put screws into the front for support (even though I could have counter-sunk & plugged them) I nixed it for the ease of a wrapped seat.

the new padded seat-

the new padded seat-

During the week I was able to get a couple 5/8″ oak dowels.
I shaped/tapered the ends to fit snugly into the mortised holes.  These dowels are now the stretchers that tie the legs together and bring stability
to the chair.
The last thing was to run & apply welting for a clean finish.

~and the rocker has a new life

the jury's out on this one, huh?

Here it is at the antique mall!
That seat is really comfy seat!

A Rocker & a half
jury’s out, huh?

Catherine

A Rocker & a half!

Read Full Post »

REcreating an Adirondack chair from this carcass!This truly was
a FUN project

but challenging.
It tested my carpentry skills throughout.  I cut MORE compound cuts 
(explained way below)

over the last 2 days
than all of last year!

THIS carcass used to look much like the chair below.  Just not nearly so nice as it came to me.
(a be-gloved, take a long hot shower at the end kind-of-knock-down chair!)

a 1930's - 1940's club chair

I actually only wanted it for PARTS, and the man giving it to me volunteered to knock it down (because it was gross).

Oh, I didn’t get off scott-free—I still had about 2K tacks to pry out.  Back in April.

Adirondack chairs don’t LOOK that complicated–but looks can be VERY deceiving!  Lesson learned.

Back in April,

sitting in the warmth of a beautiful, blindingly sunny Spring day, listening to the birds chirping

and prying out all those tacks—I was struck by how interesting the frame was and the idea of an Adirondack chair hit me.  For the Nellie’s Barn Sale.

I had a loooong and ambitious project list for the sale, so the chair only got a little of my time here & there.  The frame needed a LOT of reinforcement and repair and I needed to stew on the HOW-to of doing this.

Friday, with only 6 days left to packing-driving-off loading & setting up–I stopped everything else to give this my full attention.  I’d already been thinking about and formatting the seat slant, I just needed to commit and cut the wood.  The first of MANY challenges I would face.  

committing to a slanted seat~

some exacting cut & angles to create the seat structure~

I used a lot of OLD deck boards.
1- because they were well dried for stability.
2- because it’s going to be an OUTDOOR chair.

I ended up creating the seat structure in pieces because of the numerous angles and cut outs–and because I didn’t have any BIG enough material at hand!.  Then I used my pocket screw jig to join them all FIRMLY.

I quickly realized that it’d be advantageous to sand & paint at each step!

sanding & painting before moving on~

-Saturday-

This was one L-O-N-G day of construction.  A day of compound cuts.
8am-9pm  with nary a break, and I was exhausted.

explaining

working on the slatted back~The slatted back
CURVED at the top and STRAIGHT at the bottom.
T
he outdoor-use deck boards were only ¾” but not long enough to “force” the “twist.”  So I cut a lot of angles and doweled the boards in place at the bottom before nailing at the top.
I also ran ALL edges through the router table to restore the factory-rounded over edges.  Hence the 13 hour day.

The “worst” was fitting in the boards at and below the wings.  WoWza!
I patted myself on the back for my level of perseverance & tenacity, quietly thanking a lot of carpenters who generously shared their knowledge with me along my travels.
That hands-on learning helped me problem-solve these issues with confidence.

AGAIN- I sanded and painted before moving on.

Consumed by the challenges, I guess I forgot to take progress pictures for you to follow along- sorry.

Incidentally- I worked on the back before the seat because of all the angles and doweling.  I needed that open space to work.

working on the slatted back~The seat

I secured the 3 seat supports in place with 3″ countersunk screws.
I glued in plugs to conceal the screws then cut them flush.

The seat is wider at the front than back, so, MORE angles.  I started with the front-most board because of all the notches.

cutting all the angles into the 1st boards

Both of those notches are ALSO compound cuts—the frame they abut is curved.

the 
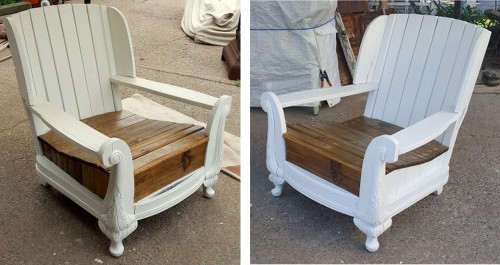
Okay– so without the progress pictures to share, you now see a “finished” chair.

A  D E E P  27″

Too deep- actually.
Normal would be 17″.
I fetched our 5’10” neighbor-lady to gauge the situation from a taller standpoint.
Yep~ still way too deep.

I grabbed a back cushion from one of the deck chairs–it made a huge difference.
It also changed my FINISH direction.  I planned on a navy & white cabana stripe theme, and an accent pillow!

So NOW I’ll stick with a clean white chair & stained seat.  Today I’ll go in search of a stylish back cushion!

before skirting the sides-

Above is the “before I skirted the sides.”  See why?

I ripped leftovers to skirt the sides and a face plate,
plus a transition piece for the curved bottom-front.

Here are the detail shots-
hope you like LOVE IT -as much as I do!
Catherine

sorry about the length of this post—

from a 1930-40's club chair to an Adirondack Porch Chair!

from a 1930-40's club chair to an Adirondack Porch Chair!

-here are some details-

from a 1930-40's club chair to an Adirondack Porch Chair!

-and here’s an early FAIL.  The fully stained seat did NOT look good!

an early FAIL!

And you can take a seat in it this Friday & Saturday at
Nellie’s Barn Sale!

Nellie's JUNE Barn Sale!

Read Full Post »

My Great Niece is turning 8!

Where DOES the time go?

a new desk for MackennaSo~she’s getting a big-girl desk for her bedroom and I’m doing the chair.  An old chair I had for the Nellie’s Barn sale—that didn’t sell.  It’s actually a sweet thing and I’m surprised to still have it.  Oh well–a score for Miss Mackenna!

She actually has GRAND ideas for REdecorating her room and I am to help!  So with the VERY animated descriptions of what she wants, I chose to

REpaint  -and-  REcover the seat with FUN FABRIC!

Here’s the old -sort of a PRESSED BACK- chair. . . that didn’t sell.

The UNsold chair from the  Nellie's Barn sale~

I had to cut wood to create a seat, I padded and upholstered it with some really soft & tightly woven sagless burlap.  It looked great, but this is how it went–

  • ladies kept walking up to check it out,
  • take a little sit down,
  • get up and feel the seat,
  • give a surprised look at its softness,
  • remark on the cheap price tag,

and walk away.

Huh?  I couldn’t pull anything from anyone for explanation.  I still don’t get it.  Was I supposed to gift it to them?

I love the detail in the chair’s back crest!

the detail of the back chair crest

My new fabric selection.

The stripes would be great for right now—but she wants her room REdecorated, so I’m going with the retro floral.  It will play well with the retro styled desk!

fabric selection~

I’ve painted the chair white, then over-sprayed it with Rust-Oleum’s Linen White Chalk spray paint for a soft look with this fabric and her FUTURE room.  This has to be a super fast project–ready to deliver for a party TOMORROW!

the newly painted chair the newly painted chair


Just a LITTLE distressing with a RAZOR BLADE

Everything’s “wet” and I’m running helter-skelter juggling 4 things at once on this Crazy-Busy day, so

it got the TINIEST amount of distressing with a RAZOR BLADE—mostly just to emphasize the crest detail.

I’ll show you the end outcome

WITH the

Birthday girl

later!

Catherine


-the new seat!

Read Full Post »

French country ladder back chairsDo you remember the 4

french ladder back chairs

I REfinished and upholstered last spring?  No?

Yeah–I dropped the ball on sharing this to completion.  Sorry.

Here’s the READER’S DIGEST version to catch you up!

Judy’s had these chairs for-EVER. . . and they were showing it.  We probably talked about this project for a year before doing it.

The rush seats were just disintegrating and those plaid seat pads became a band-aide.

Judy's ladder back chairsI took them to the strippers.
And I wish I had let them do the whole strip & refinish—it was such a MAJOR amount of work.  But -I- painstakingly sanded all of them.  HOURS of sanding and aching hands.  Sometimes DIY sucks.

Judy's ladder back chairs

Only waxing maintained the raw, pale wood we wanted—but it wasn’t enough durability for Judy.  But you can see below that even a simple clear-coat darkened the Cherry wood.  Bummer.

sanded & clear coated

The chairs sat kind of low so we played with varying ways to REbuild the seats—deciding on furniture webbing with a thicker pad for loft AND softness.

Matelassé was ordered–from Italy!  We ordered enough for a boxed covering, but discovered the chair construction dictated wrapping the seats instead—and that took much less fabric.  So the extra matelassé was used to also cover the 2 pressed back chairs I recently shared with you.

Judy's UPHOLSTERY

*We also tackled REfinishing the Bird’s eye maple table.

You know~I’ve always been pretty efficient with my cuts  -wood, fabric, whatever-  but even I was surprised at how far I stretched this yardage!

So I’m making chair seat slip covers from the very last of the fabric!

chair seat slip covers

I’ll leave you here for the moment,

I’m still working on them.

There’s a twist to reveal at the end~so check back!

Catherine

Read Full Post »

Back in early December I was asked to REwork a pair of mismatched antique pressed back chairs *The link tells how they are created!

mismatched PRESSED BACK chairs

The darker actually has a mate (and may get worked on later),

the lighter chair came from the Ottillia Catherine estate sale I ran last spring.  Judy snatched it up before anyone else saw it—ahh those rope spindles ♥ ♥ ♥ !

They would be needed for extra seating at Christmas.  So the lighter went to the strippers for sake of time–AND because  It.  Needed.  WORK.

While the guys showered it with their expertise, I REworked the darker.  It lived by/in a South-facing window and was dry and sun faded.  A light sanding and over-staining brought it back, and I played with varying stains to match the seat.

Both chairs had the telltale evidence of original caning.  After talking it all out, caning WILL probably happen down the line, but for now, I’d cut wood for upholstered seats.  I used the caning holes to attach the seats -but very carefully- so not to damage anything for the later project.

mismatched PRESSED BACK chairs

I made seat patterns with heavy card stock paper, reduced the size a little, then used it to cut the wood seats and padding.  Both seats were covered with the incredible matelasse that was ordered from Italy for Judy’s french ladder back chairs *I can’t remember if I showed you those at the end…??

Here they are, just before REdelivery.   Plus that mirror you see behind them—which is another story I’ll share soon.

mismatched PRESSED BACK chairs

Here’s the darker pressed back–with its mate.  It’s actually in pretty good condition, with exception to the busted out caning.

Catherine

mismatched PRESSED BACK chairs

Read Full Post »

I’m still here -but-

LIFE has just been more than a

LITTLE bit crazy.

For a while now.
Now don’t think I haven’t been working on projects…

it's just LIFE

it's just LIFE

French country ladder back chairs

One such project has been making over 4 French country ladder back chairs.

The rush seats were totally shot, and the stain color was very worn and “orange.”

HERE- they were waiting their turn at the strippers.  I also had the guys bleach the Cherry hoping to lighten them just a bit more.

sanding the French country ladder back chairs

W H A T.  a.  P A I N.  in the p’tutie to sand these buggers.

I tried using just about EVERY sander I own, and EVERY kind of sand paper and sanding sponge available.  There was just NO EASY WAY to tackle this job.

And it was SO dirty.

But I was totally loving that pale, light wood!

sanding the French country ladder back chairs

Below is a comparison for you to see,

WITH some disappointing results.

Once I had a chair fully sanded, I sampled several stain colors,

a brush-on water based clear coat,

and some clear wax so I could see what I liked best.

*The BRUSH-ON WATER-based clear coat did not change the color of the wood.

But as soon as the SPRAY OIL-based clear coat hit the wood~

the RED in the Cherry popped again.

sanded & clear coated

After a little conference call with the strippers, it was thought that the OIL-based clear coat was at fault.

So I used a SPRAY WATER-based clear coat on the next chair with essentially the same result.

I did notice that the water-based brush-on was sort of “milky.”  And apparently THAT made all the difference in keeping a pale wood tone. But I was UNwilling to clear coat all the chairs with a BRUSH!

Next up—the Italian Matelasse upholstery!

Catherine

Read Full Post »

. . . there’s a missing wall in this space.

Because it used to be ONE – HUGE space and is now subdivided.

And the neighbor has this large 3-paneled screen.  With a dog.  A ridiculous dog.  Annoying me to NO END.  So I’ve come up with a remedy I’ll work on today.  Otherwise, I’m trying to take it easy today—I need a day off!

I NEED that beach I’m dreaming of…sigh

THIS is my HaPPy PLacE!

Okay~ dream over~ well, deferred

~

what's WRONG in this picture?

WHAT doesn’t belong here . . . hmmmm . . .

Catherine

what's WRONG in this picture?

Ottilia Catherine's pop up estate sale!

Ottilia Catherine's pop up estate sale!

Ottilia Catherine's pop up estate sale!

AND there’s WaY more waiting for space to free up. . .

Read Full Post »

OTTILIA CATHERINE's pop up sale

At last~

things are mostly unpacked, cleaned, staged, and tagged.  The space for this sale is FULL! And numerous things are stashed in the wings to fill it back up when space opens up.

TIRED is a fit description and I am dreaming of a hot, sunny beach and a bottomless drink!

Thought I’d share a couple more of those quick projects to jazz things up for the sale!

A very quick rocker and chair REcover!

using an old mattress pad for upholstery!In the haste of time I guess I forgot BEFORE pictures~again.  The chair got a full on paint job, but the rocker just needed cleaning and polishing.

BOTH needed a new seat and I had to cut wood to fit and start from scratch.

-I used sagless burlap on the chair and

-believe it or not-

an old mattress pad on the rocker!  The soft “patina” and stitching pattern was absolutely perfect for this caned rocker.

You just never know where the best “fabric” can come from  ; D  always keep an open mind!

And BTW-

I dug through a box of old lace & pillow flange tatting we found to use for trim instead of gimp or welting on some of these projects!

just a great old rocker!

just a great old rocker!

sagless burlap and old pillow flange trim

sagless burlap and old pillow flange trim

I forgot to iron out that crease mark in the sagless burlapoooops!
THIS burlap is tightly woven and SOFT!  And, I think, fine on an occasional chair seat.

Catherine

Read Full Post »

Besides MY OWN crazy array of the usual projects,

I have been ~ I am

juggling projects for 2 other families!

TOO MANY projects at once!

For Judy~ REstyling some ladder-back chairs AND a trestle table,

plus a REdesign for a change of TV.

And THEN there is a “pseudo estate sale” for a senior couple leaving their home of MANY years–overwhelming and exhausting in the best of circumstances.  I’ll be helping them sell their treasures at the antique mall beginning April 1st!

The preliminary work is almost daunting–almost.  One bite at a time, it’ll get done!  Dressers are getting stripped–one completely REstyled!  Things are getting painted, even REcreated—

and EVERYthing is getting cleaned and polished!

Bear with me—COOL PICTURES ARE COMING!  I promise!  ; D

Catherine

Read Full Post »

Older Posts »