Feeds:
Posts
Comments

Posts Tagged ‘Braeden’s bedroom’

Uh huh—knockin’ my socks off with some (self-inflicted) aggravation____ tell you later, and sure you’ll laugh.

Yes–this is of my own making.  Figuratively and literally.

I’ve been thinking about this design -idea- for quite a while.  **Sourcing the car part was its own challenge.  I’ve fallen asleep many a night working out some of the design concepts/construction in my head.  I’ve sketched out one design to change up to another–and finally aNOTHer.

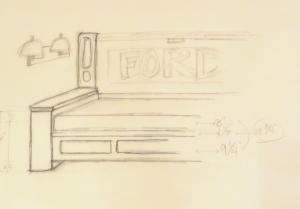
Here’s the concept AND last sketch of my crAzy idea!

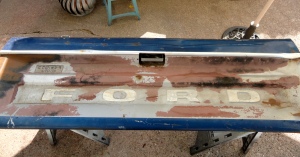
Braeden’s bed wall—is being built around a 1971 Ford pick up TAILGATE!

to be made into a bed!

the design--

You can see it is essentially a sofa.  The back of it is the tailgate, the seat is the bed.  The other half of the waterbed drawer frame is the base.  And I’m still hunting for some tail lights–oy vey!

I originally wanted a really old (1930’s-40’s) truck hood because they were small(er).  Or I thought a bumper or a grill could be really fun!  ~Couldn’t find ANYthing—affordable.

The original concept was for something unusual to become the headboard of my g-nephew’s twin bed.  But when a neighbor found this tailgate for $10, and I wasn’t sure how good it was going to look cut down from 67″ to 55″ (the space it had to fit in)—this became the new design plan!  And will probably work out better as he gets older!

I think he will be able to claim the most   ORIGINAL   bedroom of any cousin, friend or classmate around!

Catherine

Read Full Post »

This is my next project!

And, YES—I’m still working on Braeden’s room!

Curious–??   *Travel* with me!

and my crAzy ideas!

Catherine

Read Full Post »

I finished his closet, hung the trophy hooks, took some pictures—and I can’t figure out where the day went–??  I promise, I was truly busy.  All day!    Anyway. . . .

The closet!

I’m going to begin with that pole-thingy, that no one could figure out, it’s a PANTS POLE!

Make sense now?!?

How about NOW—does this help?!?

He’s 8.  What 8 year old, I ask, is very good at hanging up their clothes–??  If he can’t hang up his pants with THIS system–he’s REAlly lazy!

I think it’s a pretty big improvement!  It’s certainly a whole lot more storage and organization!  I actually wanted to install the pants pole in the center, with ½ hanging rods above and below it.  Like winter shirts above, pants pole, summer shirts.  But my niece vetoed me in favor of this order.

The shelves will be filled with sweaters to pajamas–and his games!  And I think it will fair well open to the room (the door has left the building!).

Now, the Bench, with Trophy Hooks!   At last!

Tomorrow, I have some other details to wrap up,

and then I begin working on the BED wall—I can’t wait to show you THAT crAzy idea!

Catherine

Like always, click on the pictures to see the details closer up!

I’m sharing this project with some of my favorite linky parties!

I'm a Fan of My 1929 Charmer Blog!southern hospitality

DIY Show Off

Mod Vintage Life

Photobucket

PhotobucketMy Uncommon Slice of Suburbia

Primitive and Proper

Ivy and Elephants

Beyond The Picket Fence

Photobucket

Furniture Feature Fridays

vif187Photobucket

Funky Junk's Sat Nite Special


Read Full Post »

I wish I could say I have nothing else to do but focus on Braeden’s bedroom—but that’s not LIFE!

So, he started school with a semi-torn up, and totally chaotic-looking room!

But he is having fun loading up his lockers and shelves with all his fancy LEGO’s and Pokemon stuff, and now wants to get locks for the lockers.

At 8!–what does he want to keep private already?  Me/G-Auntie; “Only if daddy has the extra key or knows the combo!”  Daddy; “No worries–I have a good bolt cutter!”

With the lockers and the dresser/bench installed, I’m working on his closet, that will now be open to the room at all times—my niece asked if it “would be too weird to remove the closet door–??”  So, I’m taking a new approach to the finishes in the closet!

I’ve hung adjustable shelves on one entire wall, and re-lined the rest with floor to ceiling, stained bead board.  Plus, I have one other trick up my sleeve to make it more VISUALLY INTERESTING!

Any guesses what this is?!?

Catherine

Read Full Post »

Everything is done with the lockers!

And tomorrow, when Brian finishes work, he and I will install Braeden’s lockers–yAy!  I can’t wait–ha–imagine how Braeden feels!

Below, as I quit last night—and today, cutting drawers down, base molding, last details, and finish waxing.

Sorry Kathy Ireland–really not feelin’ your cardboard drawers, or plastic veneers.

I am so-o-o-o-o happy to be done with this part of the project.  It was fun, exhausting, exasperating, and loooong to get through.  I looked upward more than once to acknowledge God’s sense of humor–uh huh–and I persevered.

I’ll show you how it looks installed and stylized—but here’s a preview!  It’s only propped together for the picture, so the middle shelf is missing, but you definitely get the jist!

two parts down, two to go—

Catherine

I’m sharing this project in this linky party!


Read Full Post »

There are 4 key areas of change to Braeden’s bedroom:

  1. His dresser, turned into a bench,
  2. the locker  wall,
  3. the bed  wall,
  4. and, the closet!

While I’m painting “lockers,” let me share this other little project—

I found a hotel/motel styled swing arm lamp (that would be mounted between the two beds, even has a plug-in), and altered it to go beside his bed.

I found it at the ReStore for $5!

I’ve been sitting on the finished lamp until I show you the completed bed wall,  B U T—

  • It was that ugly “brass” finish, so I used some Rust O leum hand hammered spray paint.
  • Instead of standard lamp shades–let’s do something wAy more fUn!
  • I bought a vintage globe in the flea market–I think I paid about $7.  I cut it in half, painted the inside a watery blue, trimmed the raw edges—

–et voilà, lamp shades!

And I topped them with vintage finials!

It was interesting to take the globe apart and get to see how they actually make these things!

I have a sUper cool surprise of a headboard—

Braeden has NO IDEA,

and I can’t wait to finish it and share it with you!

It took quite a bit of sourcing for THIS idea, and it may very well

knock your socks off!

Catherine

**If you go to this more recent post, you’ll find info on how to cut your globe!

I’m sharing this lighting project with these favorite linky parties!

UndertheTableandDreaming


Beyond The Picket Fence

Photobucket

I'm a Fan of My 1929 Charmer Blog!DIY Show OffPhotobucket
PhotobucketPhotobucketMy Uncommon Slice of Suburbia

PhotobucketTDC Before and Aftersouthern hospitality

Primitive and Proper


Ivy and Elephants Beyond The Picket Fenceshabby creek cottage


Photobucket

Photobucket

vif187Furniture Feature Fridays

The Shabby Nest

Funky Junk's Sat Nite SpecialJennifer Rizzo’s

Fabulously Creative Friday!


Read Full Post »

If you remember, I bought these lockers for $10 at the ReStore last April/May.  I thought they could be cool in my g-nephew’s bedroom and provide some very needed, extra storage!

Since there were soooo many interruptions trying to work on Braeden’s dresser/bench, I made a shift to the locker-wall project.

  • The lockers needed to be separated for this project–enter daddy.  I didn’t like all those burning little sparks from the grinder, so I made Brian do it! (I know–bAby!)
  • Then I built a “box” to seat them on BECause–1. the locker face-frames hang down lower than the locker boxes, and 2. the whole unit needed to be lifted off the floor.
  • Next, I used a rabbeting bit in the router table to create the void for the locker to rest in.  *The tape you see in the picture was to give me a good visual stop and start point.

At last, I could take the lockers apart to clean and paint easier.

I decided to paint the interiors this rich shade of aqua to play with the room color—Braeden loves the color of his room and made me promise not to change it!

I sure do hope these folks get paid well— what a job!

Painting the lockers became the biggest pain in the B-U-T-T.  It really was soooo much easier to paint everything in individual parts & then put back together, but NEXT TIME I will mark the outsides before disassembling–!  I painted the wrong sides but didn’t know it until AFTER I put one back together and realized it was “inside-out.”  I took everything bAck apart, repainted, and put together correctly–yAy.

So–I thought I learned my lesson for the 2nd locker–uh, huh.  Somehow I mixed up the panels–again–and painted the parts all wrong.  And–again–didn’t realize it until I was putting it back together.  ArGHHHHH.

I placed the lockers back on their “box,” and began installing the box shelves I made earlier on for this “unit.”  It was a loooong day–and pitch dark before I finally quit.

With that task sorted out—time to begin making a drawer box.  Without benefit of having a pocket screw jig–YET. STILL on my wish list–dang it.

I wanted to add the two drawers I eliminated from his (6 drawer) dresser/bench to the locker wall.  More storage–little bedroom.  An open cubby fills the end space the drawers didn’t take up.

I’ve been trying out different base moldings to wrap the bottom, but haven’t found the right piece yet.  Oh, well.  Tomorrow I’ll begin puttying and sanding, and then I can finally paint!

I can’t wait for this INCREDIBLY TEDIOUS project TO BE FINISHED!  I really can’t say I’ve ever felt like that on any other, but man-oh-man, this one has been a bear!

~Me and my bright ideas.

Catherine

I’m sharing this project with some of my favorite blogs!

Visit My 1929 Charmer Blog!DIY Show Off Project Parade

Photobucketsouthern hospitalityPhotobucket

http://salttree.net/

PhotobucketMy Uncommon Slice of Suburbia

Primitive and Proper

{Primp}


Furniture Feature Fridays

Photobucket

The Shabby Nest

Photobucket

vif187

Funky Junk's Sat Nite Special

Read Full Post »